- Starting EmuPSS
- Using Demo Pos
- →Dispense control
- →Wetstock control
- →Wash control
- →Price display control
- →Payment control
Working with EmuPSS
EmuPSS is designed to emulate the Doms PSS Forecourt Controller, which offers services that simplify the process for Point of Sale (POS) system designers to create filling station systems without requiring in-depth knowledge of the field or the devices involved.
To use EmuPSS, you will need an additional program to act as your POS system. In this document, we will describe its functionality alongside Demo POS, an application provided by DOMS and available to all its customers.
In this chapter, I will demonstrate how you can simulate specific situations that occur on a real forecourt and how you can set particular states for the forecourt devices using your POS system.
Starting EmuPSS
When the application starts, it attempts to listen for TCP/IP connections on ports 5000, 5001, 5004, and 5005. These ports are designated for communication with POS clients and cannot be changed.
If the application is unable to open these ports (possibly because they are already in use), it will notify the user of the issue and exit. You can check which application is using any of these ports and either stop it or reconfigure it. Alternatively, restarting your computer can often resolve the issue.
The configuration data discussed in the previous chapter is stored in a single file. EmuPSS must open this file upon exiting in order to function as a DOMS emulator. Initially, the application will attempt to access the last file used. If that file is not found or is corrupted, you will have the option to select a new file or create a new one with default settings. Furthermore, if you double-click any file with the ".emupss" extension, EmuPSS will try to open that file first.
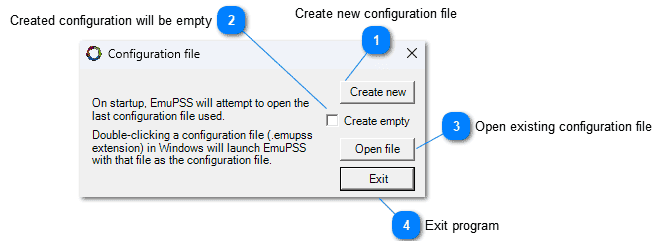
 Create a new configuration file
 rade prices
Pressing this button will create a new configuration and save it to the selected location with the specified filename. It can be created either empty or with default devices and settings, depending on the "Create empty" option.
 Created configuration will be empty
Selecting this option will create a new configuration without any default elements included.
 Open existing configuration file
Clicking this button will open a dialog to choose an existing configuration file for EmuPSS to load
 Exit program
Pressing this button will close the program.
Using Demo POS
To use EmuPSS and explore its features, you'll need a POS Client program. This program can either utilize PSS Interface Components to connect to DOMS (or EmuPSS, its emulator) for control, or it can implement the TCP/IP DOMS protocol independently.
Demo POS is a standard tool provided by the manufacturer, Doms A/S, and is available to all developers. As a result, users of EmuPSS are likely already familiar with it.
Connecting to EmuPSS
To set up the system, start by running EmuPSS on one computer within your local network. Once EmuPSS is running, it will be ready to accept client connections.
Next, launch Demo POS on the same computer or on a different one within the same network. To connect Demo POS to EmuPSS, enter the IP address of the computer where EmuPSS is running.
If both programs are running on the same computer, you can use "localhost" or "127.0.0.1" as the IP address. If Demo POS is running on a different computer, use the local IP address of the computer running EmuPSS.
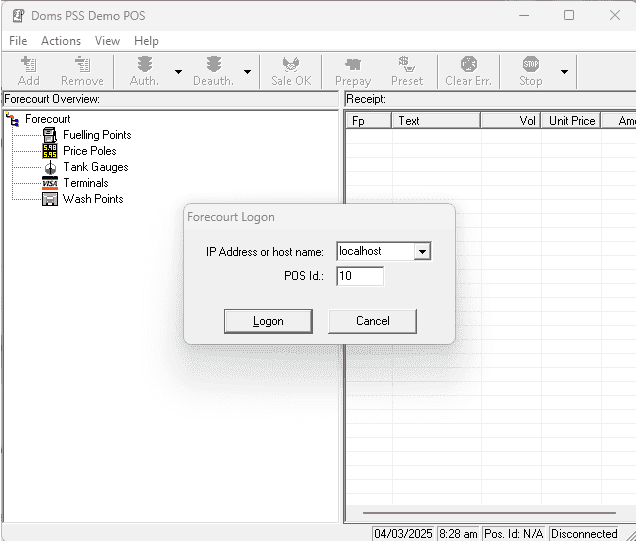
The POS ID is an integer that serves to identify this specific connection to EmuPSS. Since multiple connections may exist, and some operations may be restricted to the connection that performed a previous operation, it is important to use a unique POS ID for each POS client connecting to EmuPSS. Although this is not strictly enforced by EmuPSS, it is a best practice to ensure clarity and avoid conflicts.
Dispense control
The fuelling point control is the main component of dispense control. This control allows you to simulate dispense of fuel to the customer and adjust the fuelling point's status as desired.
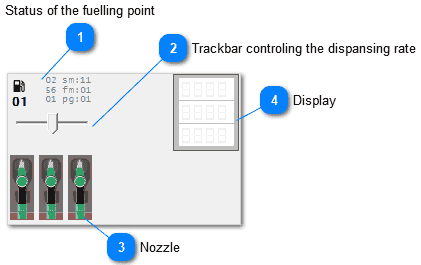 Fueling point status
These provide information about the current state of the fueling point and its active settings, which change during and after certain operations
Trackbar controlling the dispensing rateThis trackbar indicates the dispensing speed. When positioned at the far left, no dispensing occurs. At the far right, dispensing happens at the fastest rate. Users can adjust this trackbar to simulate different dispensing speeds. Please note that this setting only takes effect while fueling is authorized.
NozzleTo lift the nozzle, simply click on it with the left mouse button. The nozzle will then disappear, leaving only its empty slot visible. To replace the lifted nozzle, click on the empty slot, and the nozzle will reappear in its original position.
DisplayThe display is designed to resemble a real fuel dispenser. It will also change the background color to reflect the current status of the fueling point.
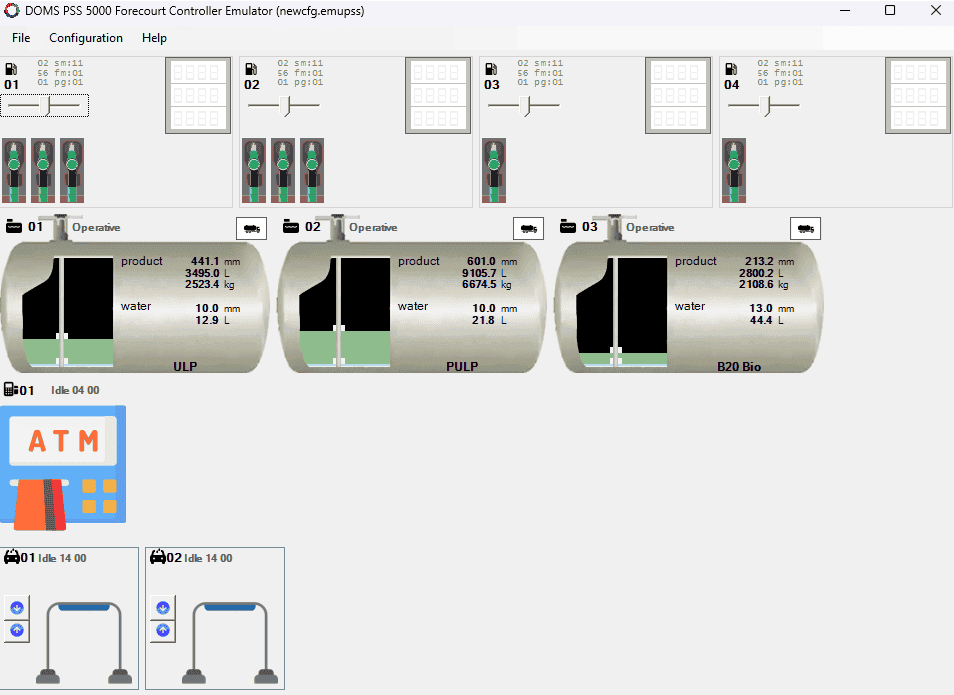
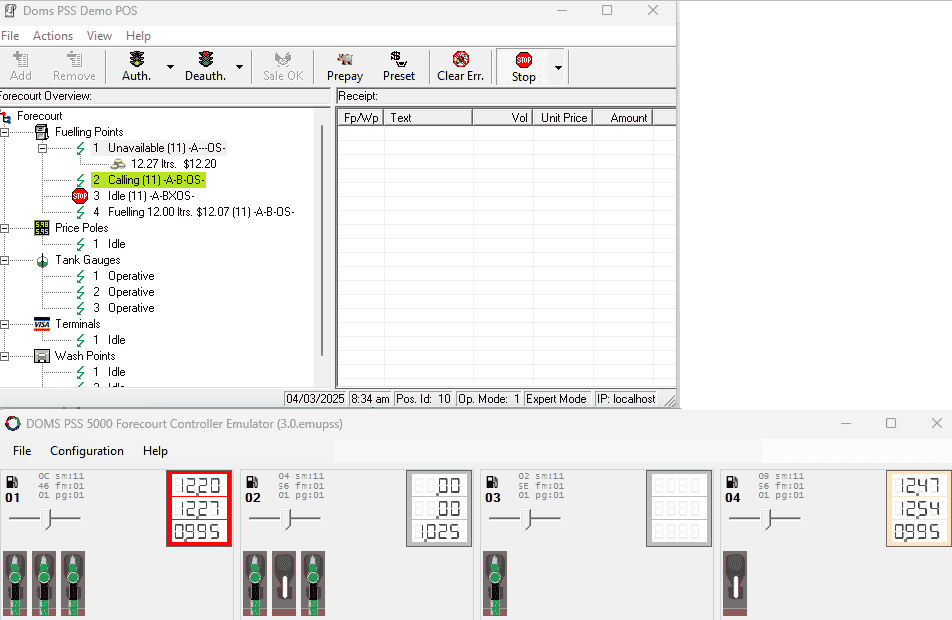
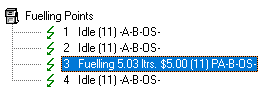
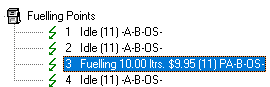
Fuelling points in Demo POS
The image below displays a running Demo POS connected to an EmuPSS on the same computer. Both programs are linked so that actions performed in one application will immediately impact the state of the other. Users can utilize all commands available in Demo POS to manage the status of the fueling points in the emulator.
In the example provided, fueling point 2 has its nozzle lifted, indicating that it is in the "Calling" state. Fueling point 1 is unavailable because it has an ongoing transaction that has not been paid. Fueling point 3 is in an emergency stop state, which means that no fueling can occur at this point. Lastly, fueling point 4 is currently dispensing fuel, and the dispensing rate can be adjusted using a trackbar.
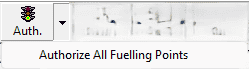
Authorize for fuelling
Fuel dispensing can only occur when the fueling point status is "Preauthorized." If the status is "Idle," lifting the nozzle will not activate the pump; instead, it will change the fueling point status to "Calling." When the pump status is "Preauthorized," lifting the nozzle will initiate the fueling process, changing the status to "Fuelling."
To stop the dispensing process, simply place the nozzle back in its holder. This action will change the status to "Unavailable," and a transaction for that specific dispensing will be created. No further dispensing can occur at this fueling point until this transaction is cleared.
There are various methods to authorize the fueling point using Demo POS. In this chapter, we will cover all of these methods, namely simple, preset and prepay.
Simple
This is the simplest form of authorization, with no additional options available. The authorization parameters are saved, and there are no restrictions on the subsequent dispensing operation.
If you want to authorize all fueling points in the forecourt, click the downward arrow to open the menu and select that option. Otherwise, clicking the button will only authorize the selected fueling point.
Preset
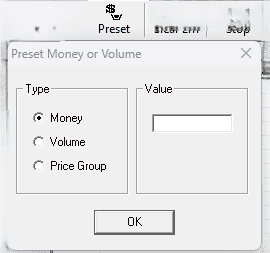
There is a preset option available for authorizing fueling points, which includes options for setting volume, money, or selecting different price groups. The DOMS protocol also supports extended authorization that can combine these options; however, the Demo POS has implemented these options as exclusive.
When a pump is authorized with a preset, any transaction made by that pump will automatically be locked with the POS ID of the connection that authorized it. Once the transaction is completed, the preset will be canceled. If there has been a change in the price group, the default pricing will be reinstated for that fueling point.
To use this function successfully, the fueling point must be in an "Idle" state. Simply select the fueling point in the Demo POS, click on the Preset button, fill out the form, and then click OK.
Preset money
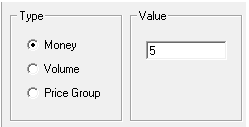
To limit the amount of money dispensed from the selected fueling point (in this case, Fp 3), you need to enter the desired amount. After confirming your input, the fueling point will change to a "Preauthorized" state. When you lift the nozzle by clicking on it, the fueling will begin. As the dispensed amount approaches the preset value, the flow will slow down and eventually stop once the specified amount is reached.
This is the state after reaching the limit. When you replace the nozzle by clicking on the empty slot, a transaction will be created in the POS.

Preset volume
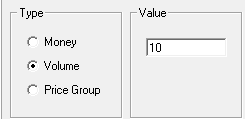
To limit the dispensed volume from the selected fueling point (in this case, Fp 3), you need to enter the desired amount. After confirming your input, the fueling point will change to a "Preauthorized" state. When you lift the nozzle by clicking on it, the fueling will begin. As the dispensed amount approaches the preset value, the flow will slow down and eventually stop once the specified amount is reached.
This is the state after reaching the limit. When you replace the nozzle by clicking on the empty slot, a transaction will be created in the POS.
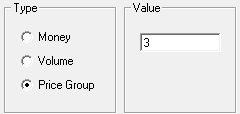
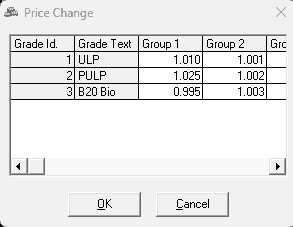
Preset price group
This is a special preset option. To use it, you must first define multiple service modes within the operational mode of the pump. Additionally, you need to establish several price groups. The service modes available to a fueling point must include the price group ID that you wish to preset. All these requirements will be explained in the following example.
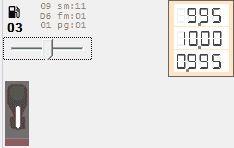
You can always check the price for each nozzle at the fueling point control. Simply hover your mouse over the nozzles, and a tooltip will pop up displaying the grade ID, name, and current price.
In previous transactions, this price was used to calculate the total amount for the fuel. It is the price defined for price group 1 (pg:01 in the status table).
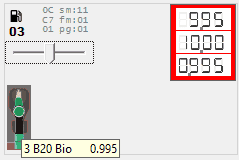
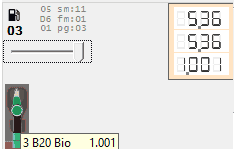
We will now preset the next fueling price from price group 3. According to the settings for the price groups, at the end of operation the price should be set to 1.001.
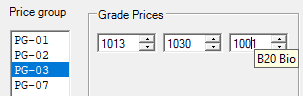
To enable this, the price group 3 must be available for the active operation mode. We need to add a new service mode and set the price group to 3 (PG Id) for that mode, as illustrated in the picture below.
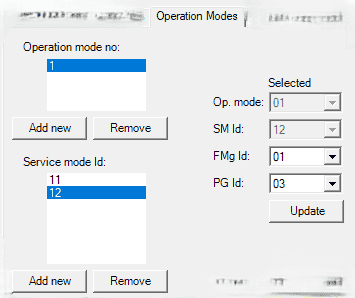
After confirming this input, the fueling point is authorized, and its price group has been changed to 3, as indicated by "pg:03" in the list of statuses.
The price from price group 3 will be used for transactions made with these settings. This preset option allows you to use the price for a specific grade from a different price group for your next fueling. There are no volume or monetary limits associated with this type of authorization. After completing the transaction authorized with this preset, the price group will revert to the value defined for the active service mode.
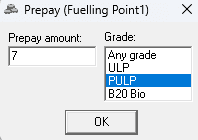
Prepay
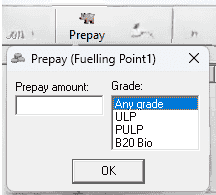
Prepay is similar to preset money, but it allows you to choose a specific fuel grade. When you select a fueling point, you will see all the available grades. Unlike preset money, this option does not automatically authorize the pump; you must authorize it manually afterward. Additionally, the fueling point does not need to be in the "Idle" state for the authorization to be successful.
If you choose "Any grade," any grade can be used for your next fuelling. If you select a specific grade, only that grade can be used for the next fuelling.
After confirming this input nothing happens, the fuelling point keeps the state.
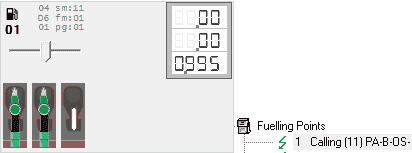
We authorize it with a simple authorization.
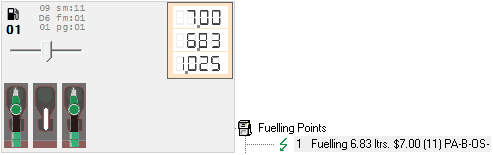
Fueling point 1 is now prepaid for grade option 2. If a non-matching grade nozzle is lifted, the state is set to "Calling," and dispensing does not start.
The incorrect nozzle is replaced, the correct nozzle is lifted, and dispensing begins until the preset amount is exceeded or the nozzle is manually replaced beforehand.
The transaction is created when the nozzle is replaced. It is also automatically locked with the POS ID of the connection that made the prepayment. Once this transaction is cleared, the fueling point is restored to its normal state.
Transactions
Transactions at fueling points are initiated by authorizing the fueling point, then lifting the appropriate nozzle to dispense a volume of fuel, and finally replacing the nozzle.
When a transaction is created, it is not locked to any specific point of sale (POS) unless it is authorized with the preset or prepay option. In such cases, it automatically locks to the POS that authorized it.
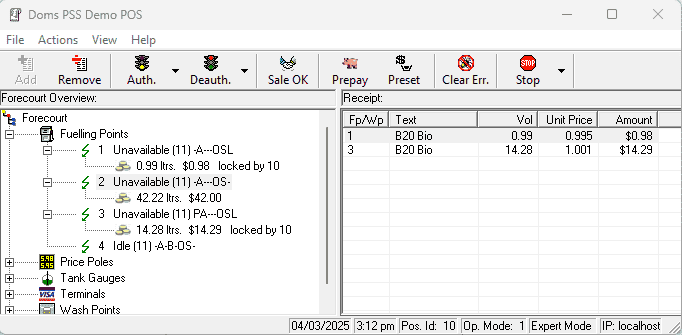
In the "Forecourt Overview" panel, we see three transactions, two of which have already been added to the "Receipt" panel. Transactions included in the receipt are locked by the same POS ID that was used during login to the Demo POS. This means that locked transactions belong to us and cannot be locked by any other POS connection. This mechanism ensures that each transaction can be processed by only one POS connection.
To add existing transactions to the receipt, simply drag and drop them into the receipt list. Once a transaction is placed in the receipt, it is locked by your POS ID that you provided during login. If you wish to unlock a transaction, drag it from the receipt back to the "Forecourt Overview" panel. This action will remove the "locked by [your POS ID]" note, and the transaction will disappear from the receipt.
When the receipt is ready, pressing the "SALE OK" button on the Demo POS will clear all transactions in the receipt, and the relevant fueling points will switch to an idle state.
Other functions
Emergency stops
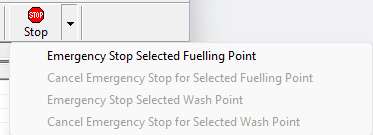
The emergency stop command activates an emergency stop flag for the fuelling point. If the status of the fuelling point is "Starting" or "Fuelling" when the command is received, it will change to one of the following:
- "Starting/Fuelling Paused" (if it can be restarted)
- "Starting/Fuelling Terminated" (if it cannot be restarted).
If the fuelling point is not currently fuelling, it will be prevented from starting. The status of the fuelling point will remain "Unavailable" until the emergency stop is cancelled.
Changing prices
Demo POS can be used to change prices. To do this, select the "Change prices..." option from the menu and enter the new prices according to the configured price groups in the controller.
The new prices will take effect immediately.
When you hover your mouse over the nozzles of the fueling point controls, a popup will display the grade name along with the current price.
Additionally, the prices on the price poles will also be updated accordingly.
Totalizers
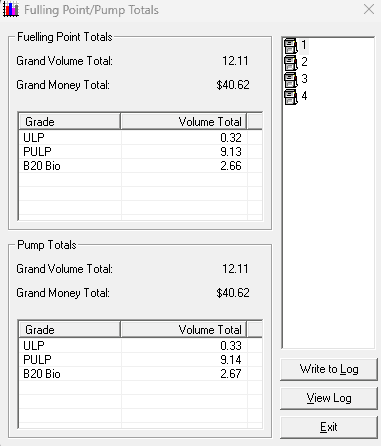
Totalizers are accessible and can be monitored using Demo POS. DOMS distinguishes between two types of totals: fueling point totals and pump totals. Fueling point totals are typically maintained by forecourt controller, while pump totals are recorded and stored in the actual dispensers. EmuPSS manages both types of totals, which can differ due to their distinct initial values.
Forced status update
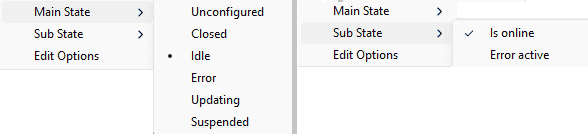
Users can quickly change the state of the fueling point by right-clicking anywhere on the control to open the context menu.
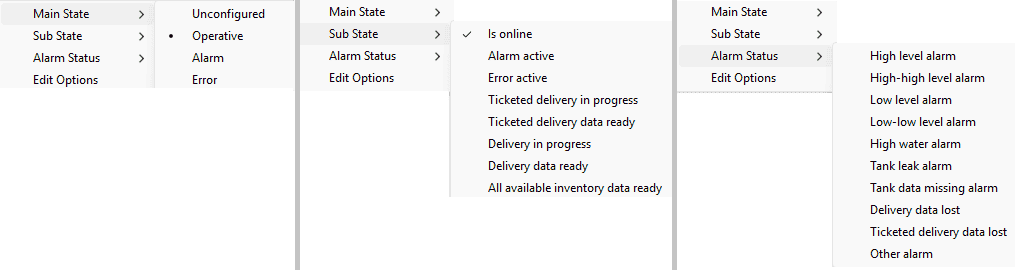
An elaborate menu will pop up, allowing you to easily change the main state, set or unset a flag for the substate, or open a common dialog to update all configuration parameters by clicking on "Edit Options."

Wetstock control
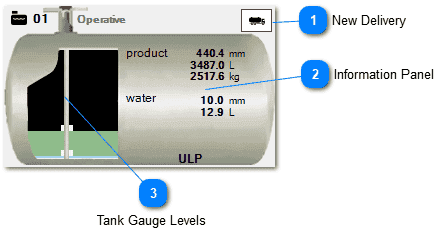 New delivery
Pressing this button initiates the new delivery process for the tank. This procedure is explained in more detail in a separate chapter.
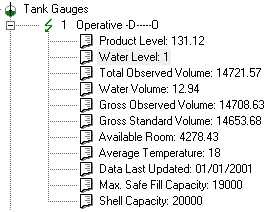
Information panelThis panel displays real-time information on essential variables for monitoring fuel stock in the tank. The product value updates during fuel dispensing at the fueling point and while the delivery is in progress.
Tank gauge levelsThe tank is modeled as a perfect cylinder based on its height and shell capacity, allowing for the calculation of product and water float levels.
Delivery management
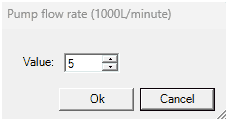
Making a new delivery using EmuPSS is a very simple task. Delivery is a managed by a single button that can be in two states. Pressing the button ask you to confirm starting of the delivery and offers you to set up the desired flow rate.
 While delivery is in progress the button changes the background color to indicate delivery.
Clicking on the same button again opens confirmation dialog for stopping the delivery.
While delivery is in progress the button changes the background color to indicate delivery.
Clicking on the same button again opens confirmation dialog for stopping the delivery.
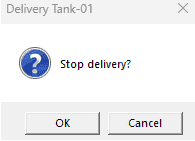
Confirming the dialog the delivery stops.
During the delivery you can monitor real-time values product volume updates in the tank.
Doms PSS has features to collect delivery data from the connected Tank Gauge System and deliver them in a standard format to the POS system.
Each tank delivery is associated with a DeliveryReportSeqNo in order to indicate that it is a part of one site delivery report.
We define a site delivery as a collection of one more delivery to one or more tanks, all of which are associated with the same DeliveryReportSeqNo.
Only one set of delivery data is held by the PSS controller. Multiple deliveries to a tank will be added to form one single delivery (one TankDeliverySeqNo) if they occur while a site delivery is in progress.
The DeliveryReportSeqNo is incremented if a site delivery is not already in progress, and either:
- one tank reports a new delivery in progress, or
- a mark Delivery Starting is received
The use of mark DeliveryStarting and finishing messages is optional but available to make it easier to collect individual tank deliveries into one site delivery report.
The intended sequence of action to use the mark functionality to create a total delivery report is as follows:
- POS sends the mark Delivery Starting before the actual delivery starts.
- Actual delivery starts
- Actual delivery stops
- POS sends the mark Delivery Finished
Tanks in Demo POS
Demo POS has commands to mark delivery, and they are available from the main menu as in image below.
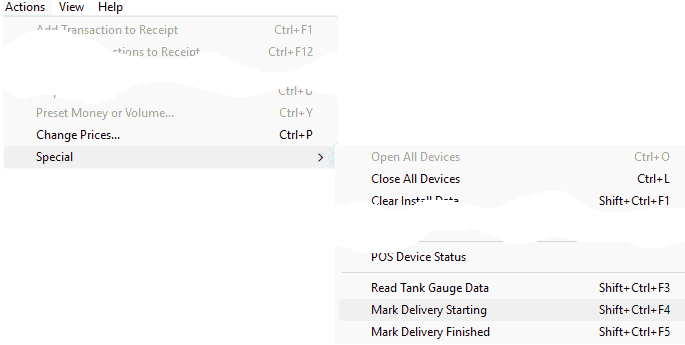
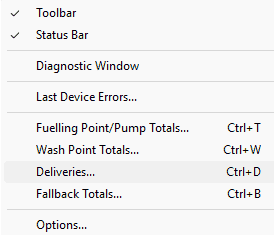
The deliveries are available in the main menu, as in the image below.
This report shows last deliveries for all tank on the forecourt.
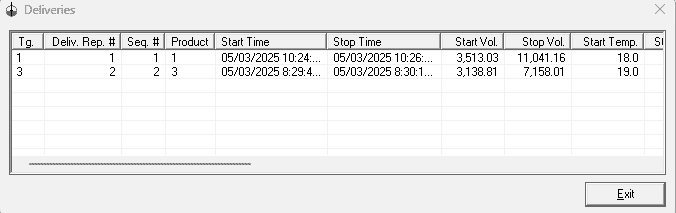
This is an example of two deliveries made without using mark Delivery Starting and Finishing.
You may notice DeliveryReportSeqNo is different for those two deliveries.

However, above is the corresponding report when delivery is marked with start and finish.
You may notice DeliveryReportSeqNo is the same for all three deliveries (2).
Demo POS will also indicate the tank gauge data for the tanks (it periodically collects them, but you can request them by clicking the main menu item "Read Tank Gauge Data").
Forced status update
Users can quickly change the state of the tank by right-clicking anywhere on the control to open the context menu.
An elaborate menu will pop up, allowing you to easily change the main state, set or unset a flag for the alarm status,or open a common dialog to update all configuration parameters by clicking on "Edit Options."
Wash control
The wash point control is the main component of wash control. This control allows you to simulate the car wash and adjust the wash point's status as desired.
This control has two buttons that regulate the position of the car in relation to the car wash. The car may not be present, be in front or behind the car wash, or be in the correct place for washing.
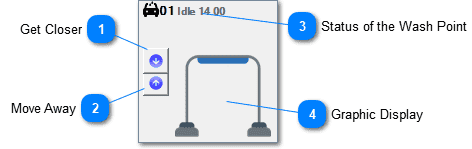 Get closer
Pressing this button will bring the car closer to you. If the car is not present in the car wash pressing the button will put the car in the position in front of the car wash.
Move awayPressing this button will move the car away from you. If the car is not present in the car wash pressing the button will put the car in the position in front behind car wash.
Status of the wash pointThis is indicator of the current status and substate of the car wash
Graphic displayThis panel represents the car position related to the car wash, as well as the current washing state. The steps needed to make a car wash in EmuPSS are explained in a separate chapter.
Car wash
Car positioning
By repeatedly pressing the upper button (get closer), the following changes occur in the state of the car wash.
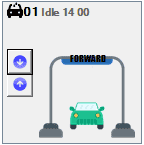 The car appears in front of the car wash, the state of the car wash point is unchanged
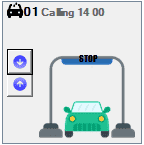 With the next click it gets into the correct position for washing and the status of the car wash changes to "Calling".
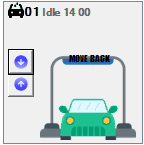 With the next click the car is behind the car wash and the status returns to "Idle".
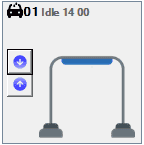 The next click on the same button causes the car to disappear.
By repeatedly pressing the lower button (move away), the same changes will happen but in the opposite direction.
The washing didn't start because the wash point was not preauthorized.
Authorizing car wash
The car wash can be authorized through the Demo POS program. A washing program can also be selected.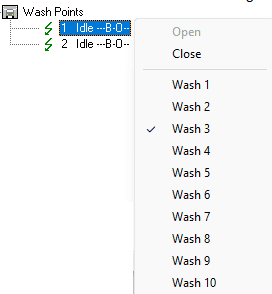 First, the washing program is selected, and then the car wash is authorized with the same button as the fuelling point.
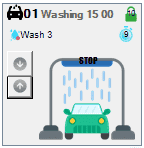 When wash point is authorized and car is correctly positioned after 3 seconds the washing will start. During the washing process, the buttons are disabled, you can't move the car. The stopwach up-right shows time in seconds left (on the image it is 9).
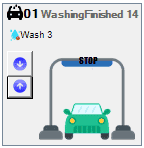 When the time runs out the washing is done and the state is updated accordingly. The buttons are enabled again and you can move the car away.
Forced status update
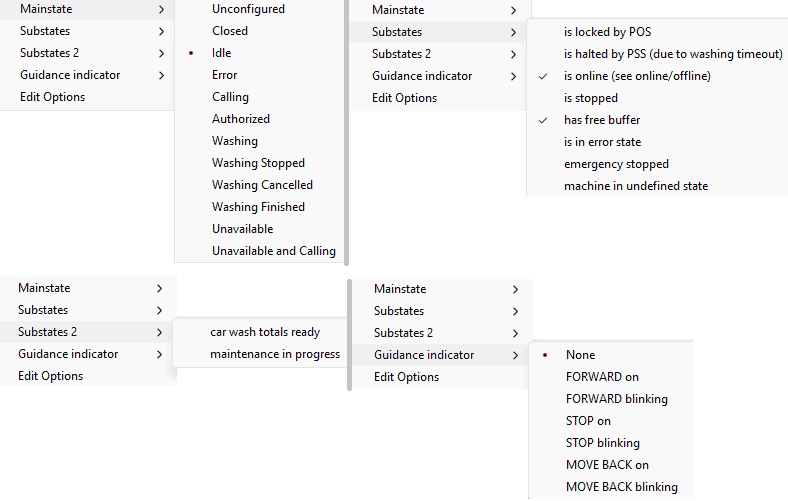
Users can quickly change the state of the wash point by right-clicking anywhere on the control to open the context menu.
An elaborate menu will pop up, allowing you to easily change the main state, set or unset a flag for the substate, set or unset a flag for the substate 2,change the state of the guidance indicator,or open a common dialog to update all configuration parameters by clicking on "Edit Options."
Price display control
The price pole control is the main component of price display control. This control allows you simulate operation of the price pole and monitor its status.
This control has no control options other than state change.
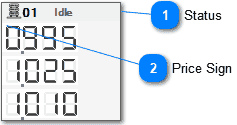 Status
Current status indicator
Price signPrice Sign for the grade and price group defined in the configuration of the price pole.
Forced status update
Users can quickly change the state of the price pole by right-clicking anywhere on the control to open the context menu.
An elaborate menu will pop up, allowing you to easily change the main state, set or unset a flag for the substate, or open a common dialog to update all configuration parameters by clicking on "Edit Options."
Payment control
The EPT control is the main component of payment control. This control allows you to simulate operation of the EPT and monitor its status.
This control has no control options other than state change.

Forced status update
Users can quickly change the state of the tank by right-clicking anywhere on the control to open the context menu.
An elaborate menu will pop up, allowing you to easily change the main state,set or unset a flag for the substate, set or unset a flat of an error status, or simply open a common dialog to update all configuration parameters by clicking on "Edit Options."
